


Blog
Types of Outdoor Lighting Techniques
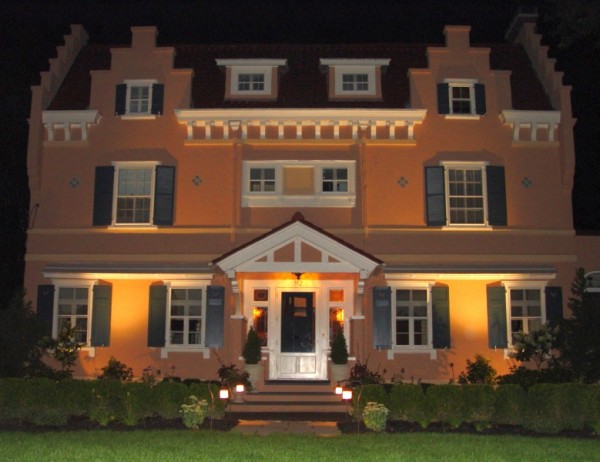
Spring is here and that means the arrival of parties. When guests come to your house for an evening get-together, the first impression you make is important, which is why having outdoor lighting is key.
We’ve already talked about the compelling reasons you should install outdoor lightingaround the exterior of your home, but now we’re going into the specifics on the types of outdoor lighting techniques available.

Path Lighting
This type of outdoor lighting is exactly what it sounds like. It often features light fixtures installed along a path to illuminate a walkway. One of the reasons you’d want to get this type of lighting is for safety purposes, but it also creates lines around the house that could accent other light fixtures.
Spot Lighting
Achieved with fixtures that focus a beam of light, spot lighting is designed to highlight some of the structures or elements around your house that deserve special attention at night.
Spread Lighting
Utilizing some of the same low fixtures as path lighting, spread lighting is meant to increase the visibility of your landscape, including shrubbery, flower beds and foliage. This is usually more low-level lighting, but it can also mean the lighting of smaller trees.
Back Lighting (aka Silhouetting)
This is when lighting is placed behind an object, but the beam is pointed away from the object at a wall. This creates a silhouette effect because you see the dark outlines of the object against a lit backdrop. An example of this is putting a light behind a bush but pointing it toward a wall.
Shadowing
Similar to silhouetting, shadowing takes a light fixture and points it toward a wall, but this time it’s placed in front of the object. That means the light will be going through shrubbery to create a shadowy effect.
Grazing
Light fixtures abutting an object and pointing directly up is known as grazing. This type of lighting brings out the texture of the object it’s illuminating. For example, if it’s next to a brick a wall, you’ll be able to see the shadows and texture of the wall much better than spot lighting.
Moon Lighting
Moon lighting harnesses the natural beauty of the moon and replicates that same downward soft lighting by installing fixtures up in trees or beneath awnings.
Tree Lighting
This is essentially the opposite of moon lighting. It uses lights pointed upward at the base of a tree.
Deck or Step Lighting

Finally, another popular outdoor lighting techniques involves illuminating a deck or steps leading up to your house. One of the main purposes of this type of lighting is to create a way for visitors to see where they’re going, similar to path lighting.
If you’d like to get outdoor lighting installed at your home, contact us today.
How to Clean a Concrete Patio
A few months ago, we discussed the difference between a deck and a patio while giving the advantages and disadvantages of both. One of the major benefits of getting a patio over a deck is that it’s much easier to clean and cheaper to maintain. Even though it’s cheaper and easier doesn’t mean you don’t have to do anything though.
So if you have one, or are considering getting one, here’s what you need to know about cleaning your patio.

Remove any clutter from the patio
The first step is to remove any items you might have on the patio. This means you should take off all furniture, planters or equipment.
Sweep away any debris
Next, use a broom or hose to get rid of debris, like dirt, leaves and branches. By making sure the patio is clean and clear of any debris, you’ll be able to thoroughly clean your patio without things getting in the way.
Use a pressure washer
There are many different of patios, but the three main types are concrete, stone and brick. For a concrete patio, it’s convenient to use a high-powered pressure washer. Doing so will remove any dirt and debris from small crevices in the patio, but it won’t do things like remove grease. For that you will need to use a cleaning solution.
An environmentally friendly solution
You can also use a commercial patio cleaning product, which can be a great option if you’re trying to be environmentally friendly because there is a wide variety of products designed specifically to be ecofriendly.
There are also homemade solutions that work well on concrete patios, including two cups of vinegar in a bucket of water and a half cup of baking soda in a gallon of water. Then use a bristled brush to give it a quick scrub. Working in sections really makes it easier to keep track of what you’ve done.
Cleaning with bleach
Here’s another option for cleaning with bleach given by howtocleanit.net:
“This is probably the least expensive, and least labor intensive ways to clean a concrete patio. Wet the entire area of concrete you want to clean. Pour bleach straight from the container onto the patio. Allow the bleach to sit for a few minutes, and you will notice the concrete beginning to look cleaner. After about fifteen minutes, rinse a small area of the concrete and determine if the bleach has worked it’s magic yet. Rinse thoroughly when complete. You should find your concrete patio is now several shades cleaner.”
Any of these methods will depend on how frequently you clean your patio and how much work it needs.
Landscaping Care Tips for Early Spring
If you take a look outside, you’ll see a blanket of fresh snow on the ground with a wintry mix in the forecast for the next day or so. It’s hard to believe that spring will be here in less than two weeks.
While it’s almost inconceivable to start thinking about spring with all this snow, it’s time to think about how you want your landscape to look for warmer weather. You shouldn’t really start doing any work to your yard until after you’re sure there’s no more frost, but here are some things to consider when it is warm enough.

Check your lawn for disease
There has been a lot of snow this winter, and one of the troubles your lawn faces at the onset of spring is snow mold, which becomes visible after the snow has melted. In our last post, we talked about how to protect your grass in winter, but thawing snow could reveal that your lawn has some snow mold.
There are two main types of snow mold: pink and gray. They usually look like dead patches of grass with some fuzzy fungus on top. If you do notice some on your lawn, use a rank to mix up the grass to get some oxygen to the blades. This will help combat the snow mold.
Mow lawn if it gets too high
Typically, right after spring, the grass won’t necessarily grow rapidly, but it will start to get higher as the weather gets warmer. It’s good to let your grass grow a little, but you should mow it when it gets three or four inches tall.
Avoid fertilizer
Many people immediately want to start fertilizing the lawn to get the healthy green color back, but it could actually hamper growth. Instead, wait until the temperatures get warmer to fertilize.
Decide what work you want done to your yard
In late winter (and early spring), you should start thinking about what type of work you want on your yard. Have you been dying to get an outdoor kitchen or install a raised patio? Do you want to build an inground pool for the kids to enjoy? If the answer is yes, you need to jump on it as soon as possible. Many companies get booked up, so to make sure your yard is ready for the summer month, contact a company like Grandview to begin work right away.
Three Ways to Protect Your Grass in Winter

The Northeast has been hit by some pretty bad snow storms this winter, especially in New Jersey.
With so much snow blanketing the Northeast this winter, it’s important to remember a few things that will keep you safe and your lawn healthy.
We’ve talked at length about the things you can do before the storm. For example, you should trim branches and trees before a big snow storm because accumulation might cause breakage, which could cause serious damage to your property. Likewise, you should prepare yourself with a shovel and materials to remove snow in order to clear walkways and driveways.
However, if you’re concerned about your lawn and want to make sure that it’s nice and healthy once the snow melts, here are a few things you can do.
Don’t walk on the grass
Even if there’s not snow covering your lawn, frozen grass is very brittle. Excessive foot traffic over portions of your lawn that may be frozen could be detrimental to its health. Not only can the tops of your grass snap off, but you can also damage the crown of your grass. If possible, you should make an effort to really use your regular walkways to avoid stepping on the grass too much.
Avoid building snowmen on the grass
We know that the best thing to do after a snowstorm is to build a nice big snowman. But if you care about your lawn, you’ll be wise to build it somewhere other than your lawn. Just like you don’t want to put unnecessary wear and tear on your lawn through foot traffic, building a five-foot snowman will put a lot of pressure on a small amount of grass. That will likely result in damage to the grass that will prevent it from becoming green in the spring.
Be vigilant of ice chunks
The last thing you really want to be wary of is snow mold, which happens when ice is compacted against grass or the lawn is not properly put to bed in the fall. To prevent this, break up large chunks of ice or snow, so it doesn’t build up.
Four Compelling Reasons Why You Should Install Outdoor Lighting
Even though the holidays might be over, it doesn’t mean the lights have to go out at your house. In fact, simply adding a few strategic outdoor lights around your property can make a huge difference—almost like night and day.
You obviously wouldn’t want to keep using those colorful Christmas lights, but you can replace those with spotlights, path lights, fiber optic lighting and much more.
If you’re still on the fence about adding outdoor lighting to your house, here are five benefits that will have you calling us for a consultation today.
Makes your house look beautiful at night
It doesn’t matter how beautiful or majestic your property is during the day; when a house is dark at night, it’s generally unattractive. This can be easily remedied with a few strategically placed lights around your yard. Outdoor lighting instantly transforms your home into a lively and warm destinations.
Dark, vague shadows become alluring accents around trees and shrubbery. Your admirable landscape will look just as good as it does in the day.
Increases the value of your home
Outdoor lighting is an easy and inexpensive way to raise the profile and value of your home by making it look beautiful at all times of the day. According to this article from MSN, exterior lighting on a home can add up to 20% to the perceived value of a home. That can be a lot of money for a little bit of work.
Deters burglary
A dark house may look uninviting to some, but it definitely looks appealing to burglars. Motion-sensing lights and outdoor lighting in general frightens off vandals and those with ill intentions. These aren’t just empty assumptions either. According to Trenton Light and Water Company, “a two-year lighting study done in Washington, D.C. shows 44% decrease in burglary and a 22% decrease in vandalism after the installation of outdoor lighting.”
There’s no doubt outdoor lighting will give you peace of mind.
Pathways are easier to see
Finally, outdoor lighting can act in a way similar to a flashlight by illuminating a dark area. You no longer have to worry about accidentally stepping off the walkway into the wet grass and your guests who might be unfamiliar with your property will have an easier time navigating it.